一、数据库的查询方法
查询 db.rawQuery(); 返回Cursor

//返回的行数
//getCount()
//判断游标是否为空 再判断游标是否长度大于0
if(Cursor != null && cursor.getCount()> 0){
    //循环移动游标
	while(cursor.moveToNext()){
        //获取游标当前指向行的数据 通过索引
		currsor.getString("列的索引 从0开始");
	}
}
二、通过命令行的方式打开Sqlite
adb shell进入到终端

//查询当前路径下的包和文件
ls

//到当前应用的目录的包下
cd 包名

//打开数据库
sqllite3 数据库名.db

//改变cmd编码方式
//修改为GBK
chcp 936
//修改为UTF-8
chcp 65001
三、相对布局RelativeLayout
相对布局练习
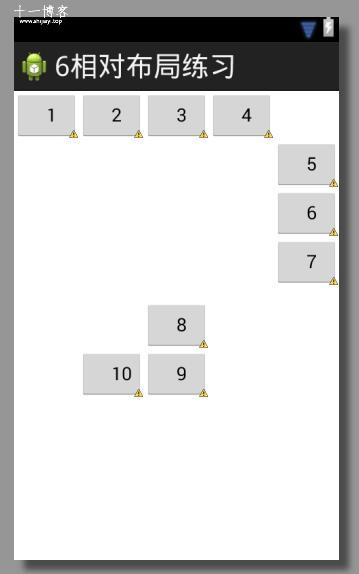
实现代码
<RelativeLayout xmlns:android="http://schemas.android.com/apk/res/android"
    xmlns:tools="http://schemas.android.com/tools"
    android:layout_width="match_parent"
    android:layout_height="match_parent"
    tools:context="com.xmkj.xdbj.MainActivity" >

    <Button
        android:id="@+id/bt_number1"
        android:layout_width="wrap_content"
        android:layout_height="wrap_content"
        android:text="1"/>

    <Button
        android:id="@+id/bt_number2"
        android:layout_width="wrap_content"
        android:layout_height="wrap_content"
        android:layout_toRightOf="@id/bt_number1"
        android:text="2"/>

    <Button
        android:id="@+id/bt_number3"
        android:layout_width="wrap_content"
        android:layout_height="wrap_content"
        android:layout_toRightOf="@id/bt_number2"
        android:text="3"/>

    <Button
        android:id="@+id/bt_number4"
        android:layout_width="wrap_content"
        android:layout_height="wrap_content"
        android:layout_toRightOf="@id/bt_number3"
        android:text="4"/>

    <Button
        android:id="@+id/bt_number5"
        android:layout_width="wrap_content"
        android:layout_height="wrap_content"
        android:layout_below="@id/bt_number4"
        android:layout_alignParentRight="true"
        android:text="5"/>
    <Button
        android:id="@+id/bt_number6"
        android:layout_width="wrap_content"
        android:layout_height="wrap_content"
        android:layout_below="@id/bt_number5"
        android:layout_alignParentRight="true"
        android:text="6"/>
    <Button
        android:id="@+id/bt_number7"
        android:layout_width="wrap_content"
        android:layout_height="wrap_content"
         android:layout_below="@id/bt_number6"
        android:layout_alignParentRight="true"
        android:text="7"/>

    <Button
        android:id="@+id/bt_number8"
        android:layout_width="wrap_content"
        android:layout_height="wrap_content"
        android:layout_centerVertical="true"
        android:layout_centerHorizontal="true"
        android:text="8"/>

    <Button
        android:id="@+id/bt_number9"
        android:layout_width="wrap_content"
        android:layout_height="wrap_content"
        android:layout_centerHorizontal="true"
        android:layout_below="@id/bt_number8"
        android:text="9"/>

    <Button
        android:id="@+id/bt_number10"
        android:layout_width="wrap_content"
        android:layout_height="wrap_content"
        android:layout_centerHorizontal="true"
        android:layout_centerVertical="true"
        android:layout_toLeftOf="@id/bt_number9"
        android:layout_below="@id/bt_number8"
        android:text="10"/>


</RelativeLayout>
四、安卓工程的单元测试
1写一个类继承AndroidTestCase

<!-- 2、配置系统函数库 -->
<uses-library android:name="android.test.runner"/>

<!-- 3、配置指令集 -->
<instrumentation android:name="android.test.InstrumentationTestRunner"
android:targetPackage="com.xmkj.linearlayout" android:label="Tests for My App"></instrumentation>
五、日志猫的使用
Log.v("这个用于查看的标记", "我是verbose级别"); 通知级别
Log.d("这个用于查看的标记", "我是debug级别"); 调试级别
Log.i("这个用于查看的标记", "我是info级别"); 信息级别
Log.w("这个用于查看的标记", "我是warn级别"); 警告级别
Log.e("这个用于查看的标记", "我是error级别"); 错误级别
六、Eclipse ADT快速启动工程的快捷键是F11
七、帧布局FrameLayout

<FrameLayout xmlns:android="http://schemas.android.com/apk/res/android"
    xmlns:tools="http://schemas.android.com/tools"
    android:layout_width="match_parent"
    android:layout_height="match_parent"
    tools:context="com.example.zhengbuju.MainActivity" >

    <TextView
        android:layout_width="200dp"
        android:layout_height="200dp"
        android:background="#FF6143" />
    <TextView
        android:layout_width="150dp"
        android:layout_height="150dp"
        android:background="#7BFE00" />

     <TextView
        android:id="@+id/tv_3"
        android:layout_width="100dp"
        android:layout_height="100dp"
        android:background="#FFFF00"
        android:onClick="delete"/>

</FrameLayout>
八、表格布局TableLayout(适合非常模块化的布局)

<TableLayout xmlns:android="http://schemas.android.com/apk/res/android"
    xmlns:tools="http://schemas.android.com/tools"
    android:layout_width="match_parent"
    android:layout_height="match_parent"
    android:paddingBottom="@dimen/activity_vertical_margin"
    android:paddingLeft="@dimen/activity_horizontal_margin"
    android:paddingRight="@dimen/activity_horizontal_margin"
    android:paddingTop="@dimen/activity_vertical_margin"
    tools:context="com.example.table.MainActivity" >

    <TableRow
        android:layout_width="match_parent"
        android:layout_height="wrap_content">

        <TextView
        android:layout_width="wrap_content"
        android:layout_height="wrap_content"
        android:text="这个长度要长一点" />

        <TextView
        android:layout_width="wrap_content"
        android:layout_height="wrap_content"
        android:text="哈哈1" />
    </TableRow>

	<TableRow
        android:layout_width="match_parent"
        android:layout_height="wrap_content">

        <TextView
        android:layout_width="wrap_content"
        android:layout_height="wrap_content"
        android:textColor="#34c9b3"
        android:text="短一点" />

        <TextView
        android:layout_width="wrap_content"
        android:layout_height="wrap_content"
        android:text="哈哈1" />
    </TableRow>

</TableLayout>
九、绝对布局AbsoluteLayout –作为了解已废弃
最后修改于 2019-10-13 09:59:28
如果觉得我的文章对你有用,请随意赞赏
扫一扫支付